Bergen Review media
  • Home
  • Food Trends
  • Featured Business
  • Bergen Towns
  • Blog Cards
  • Local Marketing
  • Contact Us

Bergen Review's Favorite Recipe's

Eggplant Involtini

2/21/2023

0 Comments

 
Picture
This Eggplant Involtini recipe is a healthier, lighter, and more satisfying take on the old-school Italian classic. Eggplant slices are first baked in the oven (rather than fried) and stuffed with a soft and creamy ricotta mixture, then finished in a rich tomato sauce. Serve it as a hearty vegetarian meal or side dish to accompany any main dishes. ​Eggplant is most certainly one of my favorite vegetables. While I love any Italian dish with eggplant like Eggplant Baked Ziti, a fun Mediterranean vegetarian stuffed eggplant, or a classic like Turkish Stuffed Eggplant, transforming eggplant into involtini is quick, easy, and delicious.

Why Should You Try This Recipe?
Eggplant and ricotta are a match made in heaven – and for good reason. An America’s Test Kitchen recipe that stood the test of time, I make this easy vegetarian recipe during the eggplant season. I know you will love it because:
Healthy and satisfying: Baking eggplant slices in the oven cuts down on prep time (and all the unwanted fat and calories from frying) and allows the meaty texture of eggplant to shine.
A feast for eyes: I always make this involtini recipe when I am entertaining. It’s one of those dishes that make people swoon as soon as you place it in the middle of the table. First, the smell hits them, and then the beauty of rolled eggplant with ricotta cheese simmering in tomato sauce.
Hearty and vegetarian: I love a vegetarian meal that can stand up on its own. Serve it with a crisp green salad such as my Spring Mix Salad or Butter Lettuce Salad on the side for a summery feel.

Yields: 4 servings   Prep Time: 20 mins    Cook Time: 40 mins    Total: 1 hr.
Picture
​For the eggplant, you will need two large eggplants, olive oil, kosher salt, and black pepper.
To make the filling, gather together ricotta cheese, breadcrumbs, grated Parmesan cheese, fresh basil leaves, lemon juice, and lemon zest. For the tomato sauce, you will need olive oil, garlic, oregano, red pepper flakes, canned diced tomatoes, and fresh basil.

Ingredient Substitutions and Notes
Eggplant: When you are shopping for eggplant, I recommend buying shorter and wider ones that are similar in size. I buy globe eggplants that are widely available.
Ricotta Cheese: I use this Homemade Ricotta Cheese recipe, but you can use storebought full-fat ricotta as well. 
Breadcrumbs: Use unseasoned regular breadcrumbs. Feel free to swap them out for gluten-free breadcrumbs instead.
Parmesan Cheese: Parmesan or Pecorino Romano cheese can be used interchangeably.
Fresh Herbs: Feel free to add more herbs to the ricotta cheese mixture, such as fresh parsley or oregano. Garnishing with fresh chopped parsley adds a special finishing touch.
Tomato Sauce: I like to make a simple tomato sauce from scratch. Or, if you want to save on time, use one jar (half a recipe) of this Homemade Tomato Sauce or any leftover marinara sauce you have in your fridge.

How to Make
The simplicity of this eggplant stuffed with ricotta really brings the eggplant into focus. Here’s how to make it:
​
Step 1: Bake Eggplant
Below are the basic steps to precook the eggplant slices for this recipe. However, if you wish to learn more about it, be sure to check my detailed post on Baked Eggplant Slices.
Picture
​Prep equipment: Preheat the oven to 400 F degrees. Set up two large baking sheets lined with parchment paper. Spray with cooking spray.
Slice the eggplants: Cut the stem end off, then peel each eggplant with a vegetable peeler. Slice eggplant lengthwise into ½-inch thick slices. Trim the rounded ends for even cooking.
Coat with olive oil: Brush eggplant slices with olive oil. Season with 1/2 teaspoon salt and 1/4 teaspoon black pepper.
Bake: Bake for 25 to 30 minutes, or until the eggplant is tender and soft to touch. Flip the eggplant slices and switch and rotate the sheets halfway through baking. 
Step 2: Prepare The Ricotta Filling
Mix all ingredients: Combine ricotta cheese, breadcrumbs, grated cheese, chopped fresh basil, lemon juice, and 1/2 teaspoon salt in a medium bowl.
Picture
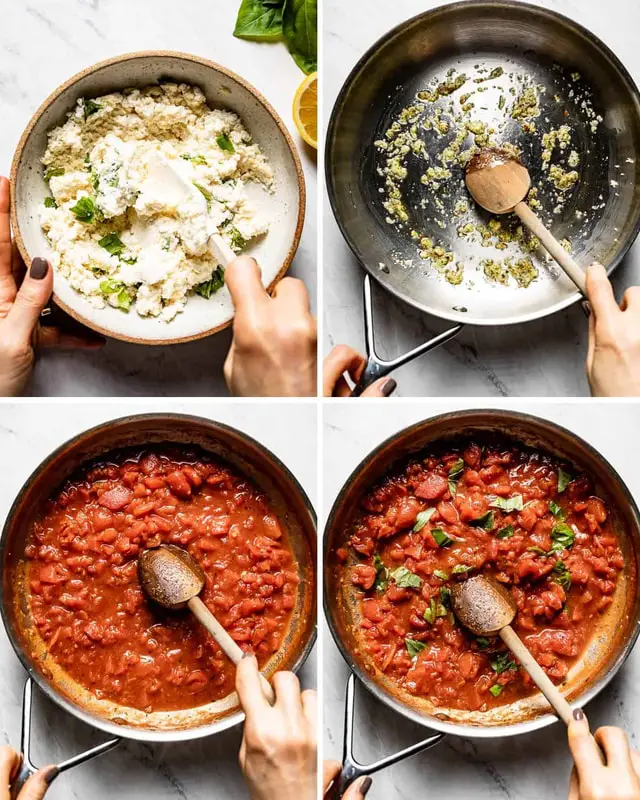
​Step 3: Make the Tomato Sauce
Saute aromatics and seasonings: In a 10-inch ovenproof skillet, add olive oil and heat for 1 minute over medium heat. Add the garlic, 1/2 teaspoon salt, oregano, and a pinch of red pepper flakes. Stir and cook for 30 seconds.
Cook tomatoes: Stir in the canned diced tomatoes. Bring to a boil and let it simmer, stirring occasionally, over medium-low heat, until thickened for about 12 to 15 minutes.
Add basil: Once tomatoes have thickened, add the chopped basil, give it a large stir and turn off the heat.
Picture
​Step 4: Assembly
​Roll the eggplant: Evenly distribute the ricotta cheese mixture onto the widest end of each eggplant slice (bottom third of each slice). Then, gently roll eggplant slices with your hands. Place seam side down, in the pan with the tomato sauce.
Simmer, then broil: Once all the eggplant slices are in the pan, bring it back up to a simmer over medium heat. Simmer for 5 minutes, then broil for 5 more minutes in the oven.
Finish and serve: Sprinkle with the remaining grated cheese and chopped basil. When serving, place a rolled eggplant on a plate and spoon tomato sauce over. 
Vertical Divider
Ingredients:

For Baked Eggplant Slices
▢2 globe eggplants each approximately 1 to 1/2 half lbs.*
▢5 tablespoons olive oil divided
▢Kosher Salt and Pepper
For Ricotta Mixture
▢1 cup homemade ricotta cheese or full fat store bought ricotta cheese
▢3/4 cup shredded Parmesan cheese Or Pecorino Romano cheese
▢1/2 cup breadcrumbs
▢1/4 cup fresh basil chopped
▢1/2 teaspoon lemon zest
▢1 tablespoon lemon juice freshly squeezed
For Tomato Sauce
▢1 tablespoon olive oil
▢3 cloves of garlic minced
▢1/4 teaspoon oregano
▢Pinch of red pepper flakes
▢1 can diced tomatoes 28 oz of can
▢1/2 cup fresh basil loosly packed and roughly chopped
As Garnish
▢2 tablespoons fresh basil roughly chopped
▢2 tablespoons shredded parmesan cheese​

​Notes
  • When you are shopping for eggplants I recommend buying shorter and wider ones that are similar in size. I also recommend making sure that they are sliced around 1/2-inch thick, which should give you 5-6 slices per eggplant.
  • Sweating eggplants: As you can see in the recipe, I did not salt the eggplants as I was making this recipe during the eggplant season. However, if you prefer salting yours, feel free to do so before baking the eggplant slices in the oven. If you are new to it, be sure to check out my guide on How To Prepare and Salt eggplant before cooking.
  • Not a fan of broiling? Alternatively, you can place the skillet in a preheated 350 degrees F oven for 10-15 minutes before serving.
Nutrition
Calories: 306kcal | Carbohydrates: 27g | Protein: 17g | Fat: 15g | Saturated Fat: 9g | Cholesterol: 51mg | Sodium: 381mg | Potassium: 641mg | Fiber: 7g | Sugar: 9g | Vitamin A: 404IU | Vitamin C: 7mg | Calcium: 376mg | Iron: 2mg
Instructions:
To prepare eggplant:
  • Pre-heat your oven to 400 F Degrees.
  • Peel the eggplants. Cut them lengthwise into 6 slices. Each slice should be about 1/2 inch thick. Trim the rounded ends so that they will lay flat.
  • Cover two baking sheets with parchment paper and spray them generously with cooking spray. Place 6 eggplant slices on each baking sheet.
  • Start with the first baking sheet. Brush each eggplant slice with two and a half tablespoons of olive oil (you use the 2 1/2 tbs olive oil to brush all of the slices) and season it with 1/2 teaspoon salt and 1/4 teaspoon pepper. Flip each slice and do the same thing for the other side. Repeat the same process for the second baking sheet.
  • Place both sheets in the oven and bake for 25-30 minutes, or until they are tender and lightly browned. To ensure even baking, flip eggplant slices and switch and rotate sheets halfway through the baking process.
  • When eggplants are baked, let them cool for 5 minutes.

To make the filling:
  • Place 1 cup of homemade ricotta cheese (or full-fat supermarket ricotta cheese), 1/2 cup bread crumbs, 1/2 cup grated parmesan cheese, 1/4 cup chopped fresh basil, lemon zest, 1 tablespoon lemon juice, and 1/2 teaspoon salt. Stir until they are all combined. Set aside.

To make the tomato sauce:
  • Heat 1 tablespoon of olive oil in a large ovenproof skillet (I used a 10-inch skillet). Add the garlic, 1/2 teaspoon salt, oregano, and a pinch of red pepper flakes. Cook, stirring constantly, for 30 seconds.
  • Stir in the tomatoes and cook, stirring occasionally, on medium-low heat, until it thickens, 12-15 minutes.
  • At the very end, add the chopped basil, give it a large stir, cover, and set aside.


​To assemble:
  • With the widest side of the eggplant slices facing you, evenly distribute approximately 1 1/2 to 2 tablespoons of ricotta mixture onto each slice. Starting from the widest end, gently roll each piece and place it, seamed side down, in the pan with the tomato sauce.
  • Bring it to a simmer over medium heat. Allow it to cook for 5 minutes.
  • Turn the broiler on, place it in the oven, and broil* for 5 minutes until the eggplants and cheese are warmed thoroughly.

To finish:
  • Sprinkle it with 1/4 cup of grated parmesan cheese and 2 tablespoons of chopped fresh basil.
  • When ready to serve, place a few eggplant rolls onto a plate and spoon a generous amount of tomato sauce over it.
0 Comments

Easy Spaghetti Bolognese

2/21/2023

0 Comments

 
Picture
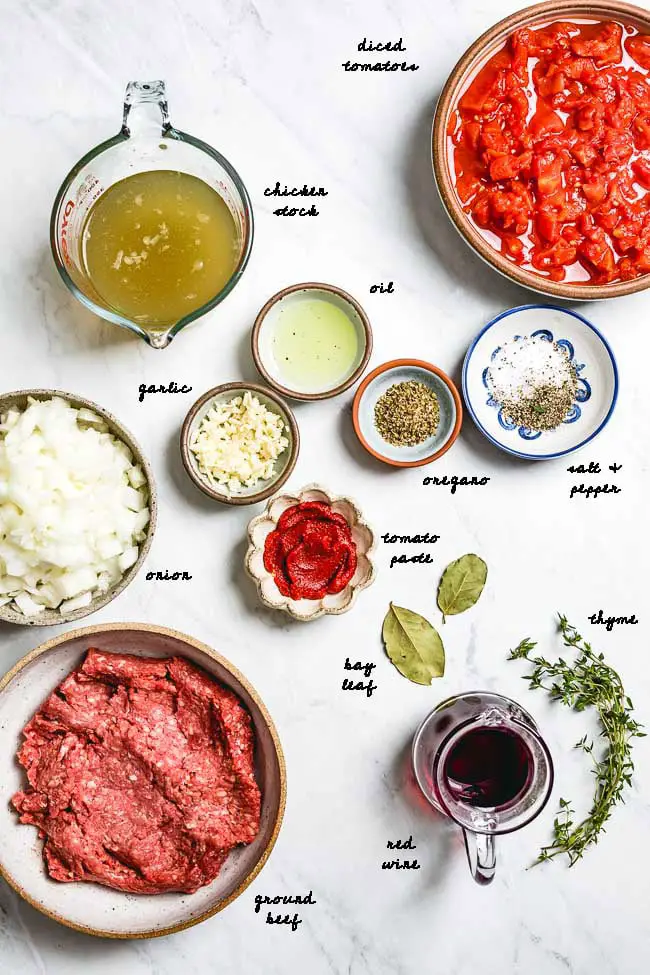
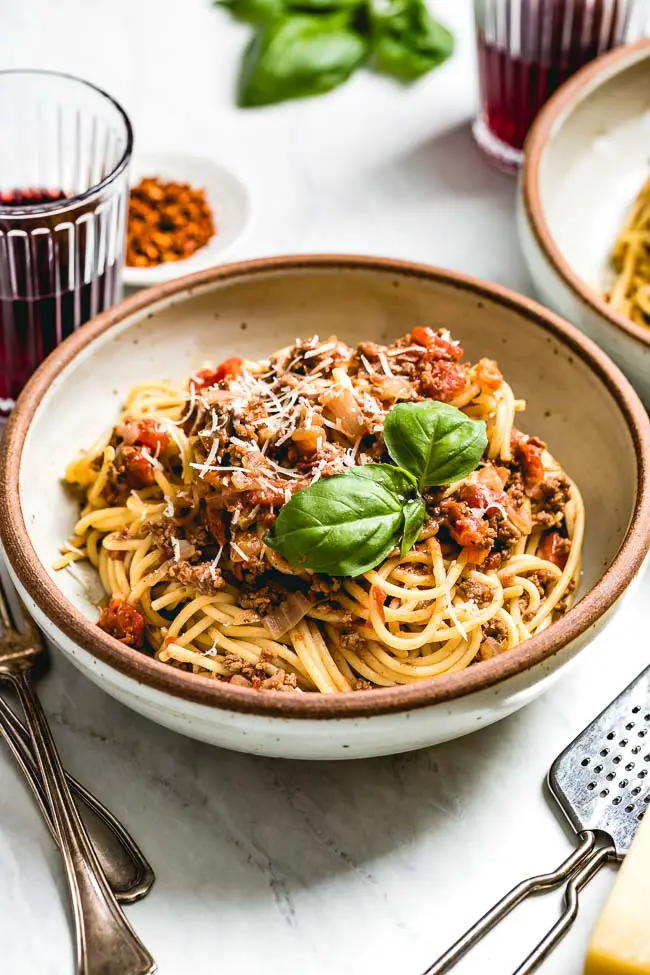
This Spaghetti Bolognese recipe is a quick and easy weeknight version of the traditional, slow-simmered Italian meal. It’s a homemade pasta dish with herbs, spices, and seasonings that is both filling and comforting. Learn how to make the best bolognese sauce with a few tips and tricks along the way!
Spaghetti Bolognese and I go back quite a while. I remember my mom making this classic Italian meal at home when I was growing up. To me, the scent of meaty tomato sauce simmering away on the stovetop is the definition of comfort food.But unlike my mom’s version that took hours on the stovetop, I’ve updated the recipe to make a quick bolognese sauce that can be prepared any night of the week. And the best part you ask? It is a crowd-pleaser.
​Made with a creamy bolognese sauce this weeknight pasta dish will be one you’ll make time and time again in about one-third of the time it used to take my mom. The trick is all about good-quality ingredients – the best type of meat, the right tomatoes, and fresh herbs and spices.

​
Yields: 6 servings  Prep Time: 15 mins  Cook Time: 30 mins  Total: 45 mins

What is spaghetti bolognese?Spaghetti bolognese is just in the name – spaghetti tossed in a sauce made from tomatoes, minced beef, garlic, wine, herbs, and spices. It is a classic Italian dish that has some American roots.
A traditional bolognese sauce made in the northern city of Bologna, Italy is served with broad, flat noodles such as tagliatelle, pappardelle or fettuccine. Another popular way to prepare it is lasagna bolognese. The thinking is that the thick sauce blends better with wider-shaped pasta.
​But tossing the bolognese sauce with spaghetti is an Americanized version of the classic. In other words, much quicker and easier, perfect for busy weeknights.
Picture
Picture
Picture
Pasta Bolognese ingredients
The ingredients for pasta Bolognese are broken down into four main groups – the sauce, the meat, the herbs and spices, and the pasta and garnish.
Sauce ingredients
  • Vegetable Oil – I like this start this traditional Bolognese with a mild Olive Oil from Italy.
  • Onion + Garlic cloves – One large or two small onions and three cloves of garlic will produce a savory flavor that really allows the meat to shine. Many Bolognese sauce recipes start with what is known as a soffritto (onions, carrots, celery), but I find that less is more here. If you would like to go the more traditional route, simply replace half the onions with an equal amount of chopped celery and carrots.
  • Diced Tomatoes – High-quality canned diced or crushed tomatoes will produce the most flavorful meat sauce. I prefer San Marzano tomatoes, which are sweeter and richer in flavor. However, you can also used cherry tomatoes (during the summer months) or even plu tomatoes.
  • Tomato Paste – An Italian tomato paste is best. Purchase a tomato paste that comes in a tube, rather than the can.
  • Red Wine – The flavors of the wine will concentrate as they cook down, so choose a medium-bodied, dry red wine such as Pinot Noir, Merlot or Chianti.
  • Chicken Stock – I prefer the lighter flavor of chicken stock, but for a richer, more complex bolognese sauce, use beef broth instead. Always make sure to purchase a low-sodium variety.
Best meat for this recipe
  • 85/15 Ground Beef – I prefer to use only ground beef (some also call it “minced beef”) for my bolognese sauce. A lot of recipes typically include some type of pork, such as pancetta (uncured Italian bacon) or ground pork, but since I am not a big pork eater to begin with, I stick with using all ground beef. As always, go with what works for you.
Alternatively, if you want you can use ground turkey or ground chicken as well.

PRO TIP: If you’d like a mix of meat rather than just one kind, many grocery stores sell a pre-mixed combination of ground beef, pork, and veal. It will be labeled as meatball mix or meatloaf mix. Simply ask your butcher if you can’t find it!
Herbs and spicesThe list of spices and herbs to put in my bolognese meat sauce recipe could be as long or as short as you want. Below are the ones I used but feel free to switch it up with whatever herbs and spices you have on hand.
  • Oregano – Dried oregano is a wonderfully classic herb that sings all things Italian to me. Make sure you don’t skip it!
  • Thyme + Bay Leaves – I used the entire thyme spring and tie it in kitchen twine with the bay leaf. The delicate leaves from the thyme fall right off, so all I have to do is remove the wrapped stems and leaf when the bolognese sauce is done cooking.
  • Kosher Salt + Black Pepper – Use the amount called for in the recipe. At the end of cooking, taste and adjust the seasoning as necessary.
Pasta and Garnish
  • Dried Spaghetti – It’s spaghetti bolognese after all! We will talk more about how to cook pasta in a little bit, but any long shaped pasta, such as linguine or fettuccine, will work too.
  • Fresh Basil – I included the basil in garnish since you want to add the basil just before serving. The residual heat from the pasta will lock in its fresh flavor and green color. If you were to add it to the sauce, the basil would wilt and turn black.
  • Parmesan Cheese – A final sprinkling of Parmesan cheese is all this traditional bolognese meal needs.
  • Optional: If you like heat, a pinch of red pepper flakes can also be sprinkled on top before serving.
Vertical Divider
Ingredients:
  • 2 tablespoons vegetable oil
  • ▢1 large or 2 small onion, chopped
  • ▢1- pound ground beef 85% 15%
  • ▢1 28 ounces can of diced tomatoes
  • ▢2 tablespoons tomato paste
  • ▢3 cloves of garlic minced
  • ▢1 teaspoon dried oregano
  • ▢1 sprig of thyme tied in a bundle
  • ▢1 bay leaf
  • ▢1 teaspoon Kosher salt
  • ▢1/2 teaspoon black pepper
  • ▢1/2 cup red wine
  • ▢1 cup chicken stock
  • ▢1/2 cup fresh basil roughly chopped
  • ▢1 cup Parmesan cheese shredded
  • ▢1 pound (16 oz.) dried spaghetti or linguini

VARIATIONS:
  • Pork and Beef: Substitute half the ground beef with an equal amount of ground pork. To really bring out the pork flavor, before cooking the onions, render 4 oz of diced pancetta or bacon in the Dutch oven until browned and crispy. Remove with a slotted spoon, pour off all but 2 Tablespoons of the pork fat, omit the vegetable oil and begin making the bolognese sauce recipe. Add the pancetta or bacon back in when you add the remaining herbs and seasonings.
  • With Cream: Once you remove the spaghetti bolognese from the heat, stir in ½ cup of room temperature heavy cream for a smooth, luxurious sauce.
  • Without Wine: Replace the wine with an equal amount of chicken or beef stock. Remember the beef stock will produce a richer, meatier flavor.
  • With Worcestershire Sauce: Adding 1-2 Tablespoons of Worcestershire sauce will give you a rich bolognese sauce. It’s a secret tip that gives this sauce that extra bit of zing!
  • With Jar Sauce: Replace the diced tomatoes and tomato paste with a large jar of your favorite store-bought spaghetti sauce. 
​​
​Instructions:
​
  1. Heat olive oil in a Dutch oven (or any other heavy bottom pot) in medium heat. Add onion. Cook until wilted, 7-9 minutes.
  2. Stir in the tomatoes and tomato paste. Cook, stirring frequently for 5 minutes.
  3. Add in the ground beef. Using a wooden spoon break it into smaller chunks. Cook, stirring frequently, until it is browned, 7-8 minutes.
  4. Add the garlic, dried oregano, bundle thyme, salt, pepper, bay leaf, red wine, and chicken stock. Give everything a stir. Bring it to a simmer.
  5. Reduce the heat to medium-low, put the lid on, and let it to cook for 20-25 minutes, making sure to stir occasionally.
  6. Meanwhile, bring a large pot of salted water to boil and cook the spaghetti according to the instructions on its package. *Please read the Pro Tip below*
  7. Once the spaghetti is ready, drain it in a colander.
  8. Discard the thyme bundle and the bay leaf from the Bolognese sauce.
  9. Add drained pasta into the sauce. Stir it all together making sure that the pasta is generously coated with the sauce.
  10. Stir in the fresh basil and top it off with grated Parmesan cheese.
  11. Serve.

​Nutrition
Calories: 623kcal | Carbohydrates: 62g | Protein: 30g | Fat: 26g | Saturated Fat: 13g | Cholesterol: 66mg | Sodium: 810mg | Potassium: 521mg | Fiber: 3g | Sugar: 4g | Vitamin A: 317IU | Vitamin C: 2mg | Calcium: 240mg | Iron: 3mg

PRO TIP: Cook the pasta shy of one minute according to package directions, reserve 1 cup of the starchy cooking water, drain and add the pasta to the pot with the sauce. This is the secret to restaurant-quality pasta! The pasta will continue cooking in the pot with the sauce, releasing it’s natural starch and sticking to the sauce. The reserved cooking water is there for insurance, just in case you need to adjust the sauce’s consistency.
0 Comments

Cuban Roasted Cornish Hens

2/21/2023

0 Comments

 
Picture
By Aysegul Sanford
This Roasted Cornish Hen recipe is the perfect special occasion meal that you can make whenever you want to impress. This easy Cornish chicken dish is made by marinating Cornish game hens in a lime-juice-garlic-fresh oregano based marinade overnight and roasting them in the oven low and slow for almost 2 hours. The Cornish hen marinade I use here is out of this world. I encourage you to prepare it a day in advance and roast for perfection right before serving.
​
​Why should you make this Cornish hen recipe?
​Having lived in the Caribbean for a number of years, I knew I needed to try this Roasted Cornish Hen recipe as soon as I saw it on my friend Eva’s cookbook, Adventures in Chicken (affiliate link). And, let me tell you, this easy straightforward recipe did not disappoint. There is so much to love about it, but here are a few that comes to mind right off the bat:
  • A Creative and impressive chicken dish: It is visually impressive and perfectly portioned worthy enough as the main course of a holiday dinner (or any other special occasion or dinner party) or as a humble Sunday supper when you want to treat your family.
  • ​Only 15 minutes of hands-on time: While it takes about 2 hours for the Cornish hens to bake, the actual preparation time is only about 15 minutes, which makes it ideal when you have a million other things you need to worry about when making dinner.​
  • Roasting is the best way to cook Cornish hens: You can cook these special breed of chickens in other ways but I find that roasting is the way to go. Thinking that you might have new to cooking Cornish game hens, I thought it would be great to share some of those questions and cover them in the recipe below.
  • A great alternative to turkey during the holidays: While turkey is traditional, if you are serving a smaller crowd, this slow roasted Cornish hen recipe is ideal and a great alternative to turkey.

Yields: 4 servings    Prep Time: 20 mins     Cook Time: 2 hrs  Total: 2 hrs 20 mins

Vertical Divider
​How to prepare these small birds for roasting?Before I talk about how to marinade and then bake the Cornish hens, I wanted to talk about how to prepare them. Whether I am cooking a regular whole chicken or cornish hens, I truss my chicken as I find that doing so helps with getting an evenly roasted cornish hen. If you are not familiar with the term “trussing” allow me to explain:
Trussing is a technique that helps poultry keep their shape and prevents certain parts of the chicken from burning during the cooking or baking process. Most people use kitchen twine to truss a chicken, but this video shows how to truss a Cornish hen uses nothing but the Cornish hen itself. I am sharing it here as it is such an easy technique that requires no additional equipment and is super easy to apply.
With this being said, this is an optional step. If you are short on time, you can simply tie the legs with butchers twine and call it a day.
Ingredients:
The ingredient list is inspired by Cuban cuisine but you can adjust it with whatever you have on hand. If you follow in Eva’s footsteps, gather limes (to squeeze them), olive oil, cloves of garlic, fresh oregano leaves, onion, water, and salt and pepper.
When shopping for cornish game hens at the grocery store, look for birds that are about 1 to 1 1/4 pounds. I find that smaller birds are ideal, especially if you want to serve one per person.
Picture
Ingredients
For the Cornish Hen Marinade
  • ▢2/3 cup freshly squeezed lime juice from 8-10 juice limes – plus 1 more sliced (optional)
  • ▢2/3 cup extra virgin olive oil
  • ▢6 cloves garlic peeled and minced
  • ▢2 tablespoons fresh oregano leaves chopped – more as garnish
  • ▢1 teaspoon ground cumin
  • ▢1 teaspoon Kosher salt
  • ▢1/2 teaspoon black pepper freshly ground – plus more for finishing it off
  • ▢4 Cornish game hens about 1 pound each, rinsed and pat-dried thoroughly with paper towels

To Roast The Cornish Hens:
  • ▢1 cup water or chicken stock
  • ▢½ small yellow onion sliced thinly

​Instructions
  • To make the marinade: Whisk together the lime-juice, olive oil, garlic, oregano leaves, cumin, salt and pepper in a bowl.
  • Divide the marinade in between two 1-gallon resalable plastic bags. Place two hens in each bag, make sure the marinade is distributed evenly (going into the cavity of the hens) and press to get as much air as possible out of it before sealing. Repeat the same process for the other two hens. Place them in the fridge and marinade for at least 4 hours or preferably overnight.
  • To roast the Cornish hens: Pre-heat the oven to 425 degrees.
  • Arrange slices of onion at the bottom of a casserole dish or a large ducth oven. Place hens, the marinade, and water on the bed of onions. Sprinkle the hens with freshly ground black pepper. If preferred, slice a fresh lime and place it around the birds.
  • Roast for 20 minutes. Reduce the heat to 375 F degrees and roast for 1 hour 15 minutes to 1 hour 30 minutes.
  • Let them rest for 20 minutes, garnish with fresh herbs, and serve.
Ingredient Substitutions & Variations:
  • Lemon vs Lime: You can use an equal amount of lemon juice (and lemon wedges or lemon slices) instead of limes.
  • Fresh herbs: While fresh oregano is delicious in this recipe, you can play with other fresh herbs like Italian parsley, thyme sprigs, and fresh rosemary sprigs.
  • Extra liquid: This recipe uses a cup of water as an additional liquid to use during the roasting process. If you have it, you can substitute it with chicken broth.
How To Cook This Recipe?The roasted cornish hen recipe has 2 folds:
Make the Cornish Hen Marinade:
Picture
  • Make the marinade: Inspired from the Cuban cuisine, this easy-to-make Cornish game hen marinade has just a few ingredients. To make it, simply whisk together olive oil, garlic cloves, fresh oregano leaves, freshly squeezed lime juice, ground cumin, and kosher salt and black pepper in a small bowl.
Picture
  • Marinade the Cornish chickens: Once the marinade is ready, divide it into 2 large food storage bags (I used 1-gallon size plastic Ziploc bag) and transfer hens into the bags (2 hens per bag). Make sure that the marinade is well distributed (and going into the cavity of each hen.) Get the air out of each bag as much as possible, seal and let it marinade for 4 hours, or preferably, overnight.
​
How To Roast Cornish Hens To cook Cornish hens in the oven:
Picture
  1. Slice an onion: Place a sliced onion at the bottom of a large 6 3/4-quart dutch oven (affiliate link), an ovenproof 9X13 casserole dish or a shallow roasting pan. Pour in a cup of water (or chicken stock).
  2. Arrange the cornish hens: Remove the hens and all the marinade for the bags. Transfer them to the dutch oven (or casserole dish) with the breast meat side up, and make sure that they are snuggly. If preffered, add in a sliced lime.
  3. Roast in the oven: To roast cornish hens, first start in a preheated 425-degree oven and bake them for 20 minutes. Then, bring down the temperature to 375-degrees and continue to cook for another 1 hour 15 minutes to 1 hour 30 minutes or until the internal temperature reaches to 180 F degrees (80 C degrees).
Picture
0 Comments

Crockpot Chicken Tomatillo Soup

1/13/2023

0 Comments

 
Picture
By Aysegul Sanford
This Crock Pot Chicken Tomatillo Soup is an easy-to-make and set-it-and-forget recipe that you can make with only 15 minutes of hands-on time. Packed with all the Mexican flavors we love, this tomatillo stew is going to be the next weeknight meal you can put together in the morning and enjoy at dinner time.
An easy to make crockpot chicken tomatillo soup recipe that will take you no more than 15 minutes to prep. If you are looking for a way to up your chicken soup game, this delicious slow cooker chicken soup recipe is the way to go.

Ingredients
  • 2 pounds boneless skinless chicken thighs, trimmed (910gr) Chicken breasts can also be used
  • 1 1/4 teaspoons kosher salt
  • 1/2 teaspoon black pepper
  • 1 1/2 pounds tomatillos, husked, rinsed and cut in quarters (680 gr)
  • 2 jalapeno peppers chopped
  • 3 cloves of garlic peeled and chopped
  • 3 cups homemade chicken stock (720 ml) or store-bought chicken stock would also work
  • 1 cup fresh cilantro chopped
  • 2 tablespoon lime juice and more as garnish
  • 1 ripe avocado cubed as garnish

​Instructions
  • To prep the chicken: Throughly dry the chicken thighs using paper towels. Season both sides with salt and pepper. Let them sit on the counter as you prep the rest of the ingredients.
  • Place the tomatillos, jalapeno peppers, garlic, and chicken stock in the bowl of your crockpot.
  • Transfer the chicken into the bowl.
  • Set it to low heat setting to cook for 7-8 hours or on high for 5-6 hours.
  • When cooked, using a slotted spoon, transfer the chicken to a bowl. Shred it in leaving it in large chunks and set aside.
  • Add in the cilantro into the slow cooker. Using an immersion blender, puree the tomatillo mixture until smooth.
  • Return shredded chicken into the bowl.
  • Stir in the lime juice. Taste for seasoning and add in if necessary.
  • Garnish with slices of jalapeno pepper and avocado.

Yields: 6 servings  Prep Time: 15 mins  Cook Time: 8 hrs  Total Time: 8 hrs 15 mins​
0 Comments

    Author

    Write something about yourself. No need to be fancy, just an overview.

    Archives

    February 2023
    January 2023

    Categories

    All
    Cornish Hens
    Eggplant
    Pasta
    Soups

    RSS Feed

The Bergen Review is Bergen county's concierge for the best businesses, restaurants & venues in New Jersey. Our agency has over 10 years experience in web branding, online media and marketing. Our team of experts scour every nook and cranny of New Jerseys best businesses, restaurants & venues to present our clients the full scoop of where best deals & experiences are.  Even after researching & looking at reviews, finding the REAL scoop on what Businesses, restaurants or venues best fit your interest can be a challenge. Bergen Review Media has a team that researches & visits various establishments. Making sure the consumer gets the best experience.

Vertical Divider
Bergen Review Media was Named Best in Search By TOP SEO's
Picture

Picture
Vertical Divider
Picture

Picture
Vertical Divider

Picture
Vertical Divider
Picture
WE'RE MORE THAN A MEDIA GROUP
WE'RE PART OF YOUR COMMUNITY

Local Marketing
Archive
Blog
Contact Us
Picture

Front Page
Restaurants
Featured Business
Privacy Policy

​
© 2024 Bergen Review Media.  |  All rights reserved. 
  • Home
  • Food Trends
  • Featured Business
  • Bergen Towns
  • Blog Cards
  • Local Marketing
  • Contact Us